
This post may contain affiliate links. As an Amazon Associate, I earn from qualifying purchases at no extra cost to you.
Table of Contents
🍴 Top Kitchen Essentials You'll Love


Introduction to 5 Joyful Baking Tips for a Sweets Christmas Tree Theme
As the holiday season arrives, so do the delightful aromas of cookies and treats wafting through the kitchen. One of the most joy-inducing creations you can whip up is a Sweets Christmas Tree, adorned with colorful icing and sprinkled with edible glitter. Have you ever wondered how to make your holiday baking a little more cheerful? The answer lies in these 5 Joyful Baking Tips for a Sweets Christmas Tree Theme that promise not just visually stunning results but also delicious bites for all to enjoy.
This festive treat isn’t just about decorating a cake or cookies like a tree; it brings together family and friends, spreading joy and togetherness. It’s an activity that involves creativity and imagination at every step. Imagine the smiles as little hands help in icing the branches and placing the candy ornaments. This experience transforms simple baking into a cherished holiday memory.
What makes this recipe unique is its versatility. You can customize your Sweets Christmas Tree to cater to different tastes, making it a perfect centerpiece for your holiday festivities. Whether you’re a novice baker or an experienced chef, these tips unlock the full potential of your baking prowess. With the right guidance, you can create a masterpiece worthy of a festive table display.
Furthermore, the essence of the holidays isn’t just in the sweetness but also in the memories you create while baking. The anticipation leading to the reveal of your beautiful Sweets Christmas Tree fills the air with excitement. With these 5 Joyful Baking Tips for a Sweets Christmas Tree Theme, you’re not just baking; you’re crafting festive joy.
Key Benefits of 5 Joyful Baking Tips for a Sweets Christmas Tree Theme
Why You’ll Love This Recipe
- Easy to follow, making it suitable for bakers of all ages.
- Offers a canvas for creative expression and customization.
- Great for family bonding and creating lasting memories.
- Can be made in advance for holiday convenience.
- Perfect for parties, gatherings, or as a holiday gift.
- Tasty, treat-filled delight that appeals to both kids and adults.
What Makes It Stand Out
A Sweets Christmas Tree isn’t just a dessert; it’s a festive tradition that sets the tone for holiday gatherings. This creation stands apart due to its inviting nature, encouraging everyone to gather around and take part in the decorating process. Whether you use traditional gingerbread, cake pops, or a stack of cookies, customizing your tree allows for personal flair and originality.
Moreover, this festive tree can be themed to match your holiday decor. With edible ornaments, colorful icing, and imaginative designs, each Sweets Christmas Tree can tell a story that resonates with your family’s traditions. Perfect for holiday parties or as a centerpiece, this dessert will undoubtedly be a hit with everyone.
Ingredients for 5 Joyful Baking Tips for a Sweets Christmas Tree Theme
Complete Ingredient List with Measurements
- 2 cups all-purpose flour
- 1 cup granulated sugar
- 1/2 cup unsalted butter, softened
- 2 large eggs
- 1 cup powdered sugar (for icing)
- 1/4 cup milk (for icing)
- 1 tsp vanilla extract
- Assorted candies for decoration (M&M’s, gumdrops, chocolate chips)
- Edible glitter or sprinkles
Substitutes and Alternatives
For those with allergies or dietary restrictions, there are several easy substitutions. If you’re looking for a gluten-free option, opt for almond flour or a gluten-free flour blend. For a dairy-free version, consider using coconut oil instead of butter and almond milk instead of regular milk.
If you’re vegan, you can substitute eggs with flaxseed meal mixed with water, and use non-dairy butter alternatives. Remember that flavor and texture may vary slightly, but the spirit of your Sweets Christmas Tree will shine through with any adjustments you make.
How to Make 5 Joyful Baking Tips for a Sweets Christmas Tree Theme – Step-by-Step Directions
Step 1 – Prepare Ingredients
Gather all your ingredients and measure them out. This will help streamline the baking process, ensuring you have everything at your fingertips when needed. Preheat your oven to 350°F (175°C) to have it ready when your batter is mixed.
Step 2 – Cook the Base
In a mixing bowl, cream together the softened butter and granulated sugar until light and fluffy. This usually takes about 3-4 minutes. Make sure to scrape down the sides of the bowl to incorporate all ingredients thoroughly.
Step 3 – Mix in Wet Ingredients
Add in the eggs one at a time, mixing well after each addition. Then, incorporate the vanilla extract for added flavor. It’s essential to achieve a well-combined mixture for the perfect cake texture.
Step 4 – Combine Dry Ingredients
In another bowl, whisk together the flour and a pinch of salt. This ensures the salt is evenly distributed, preventing any salty pockets in your cake. Gradually add this dry mixture to the wet ingredients, blending gently to avoid overmixing.
Step 5 – Pour Batter into Molds
Grease your tree-shaped molds or line them with parchment paper. Pour the batter evenly into the molds. If you are creating multiple layers, ensure each one is level before baking.
Step 6 – Bake the Base
Place the molds in the preheated oven and bake for about 25-30 minutes or until a toothpick inserted comes out clean. Allow the cakes to cool in the molds for a few minutes before transferring them to a wire rack.
Step 7 – Prepare Icing
While your cakes are cooling, prepare the icing. In a bowl, mix powdered sugar with milk until you achieve a thick yet spreadable consistency. Adjust with more milk or sugar as needed until it’s just right.
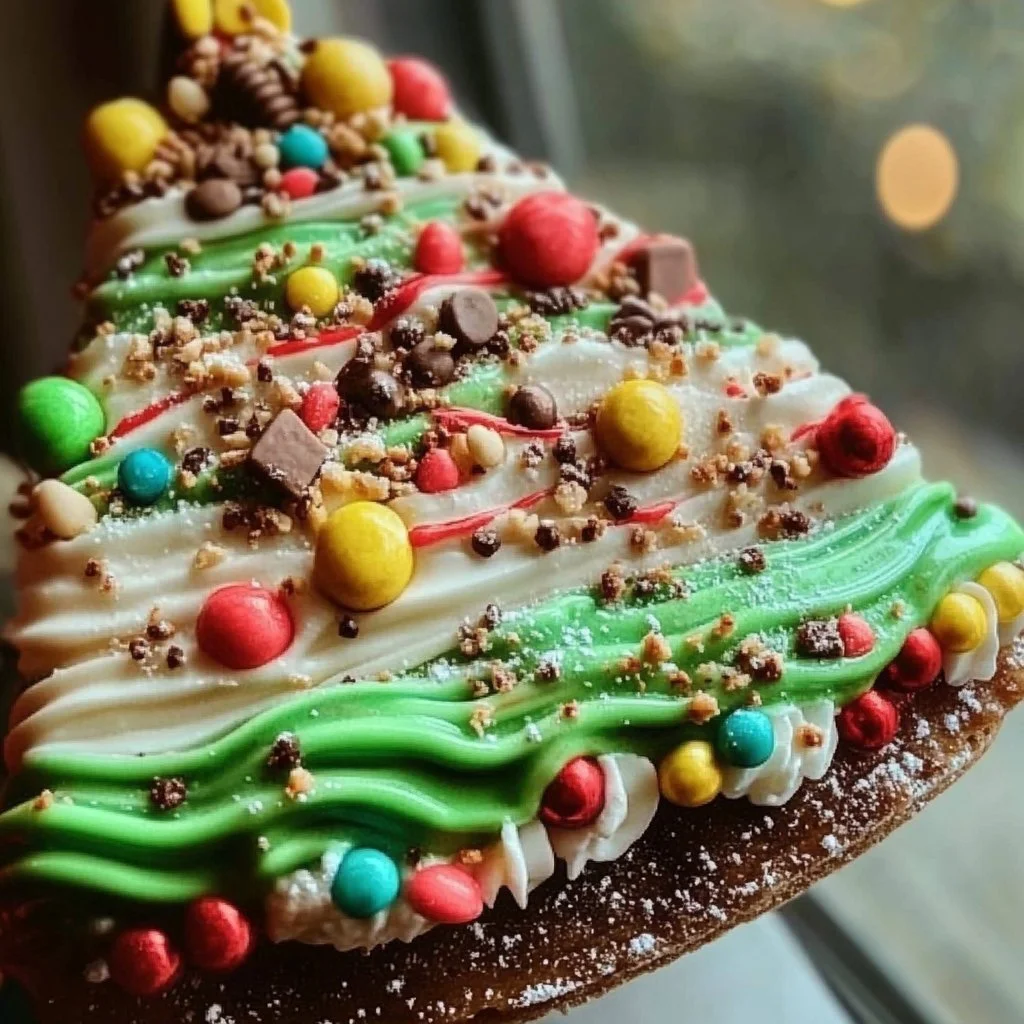
Step 8 – Decorate Your Tree
Once your cakes are completely cool, use your icing to blend each layer. Stack them to create your tree shape. Then, let your creativity flow by topping it with assorted candies, sprinkles, or edible glitter for that festive look.
Serving Suggestions for 5 Joyful Baking Tips for a Sweets Christmas Tree Theme
Best Occasions to Serve This Dish
A Sweets Christmas Tree is perfect for various holiday occasions. Host a festive gathering where guests can contribute their favorite toppings, making it a fun centerpiece. This treat is also ideal for holiday school parties, family Christmas dinners, or as a show-stopping dessert during New Year’s celebrations.
What to Serve With It
Pair your Sweets Christmas Tree with hot cocoa, spiced cider, or a festive punch. You could also offer a side of whipped cream or vanilla ice cream to complement the sweetness of the tree.
How to Store 5 Joyful Baking Tips for a Sweets Christmas Tree Theme Properly
Best Storage Practices
Store any leftover Sweets Christmas Tree in an airtight container at room temperature for up to three days. If you prefer to keep it longer, consider refrigerating it. Just ensure it’s wrapped properly to prevent drying out.
Reheating and Freezing Tips
Reheat individual slices of the tree in the microwave for about 10-15 seconds for a warm treat. If you plan on freezing, wrap the entire tree in plastic wrap followed by aluminum foil. It can last up to three months in the freezer. For best results, let it thaw overnight in the fridge before enjoying.
Tips & Tricks for 5 Joyful Baking Tips for a Sweets Christmas Tree Theme
Mistakes to Avoid
- Overmixing the batter can lead to a dense cake.
- Not allowing the cakes to cool completely can cause the icing to melt off.
- Skipping the greasing or lining of the molds can lead to sticking.
- Using too much milk in the icing will make it runny; aim for a thick mixture.
- Forgetting to measure your ingredients accurately can alter the outcome.
Extra Tips for Better Results
For a richer flavor, add a pinch of cinnamon or nutmeg to the batter. To improve presentation, use a piping bag for your icing to create beautiful designs. Lastly, consider a drizzle of chocolate over the tree for an irresistible finish.
Recipe Variations of 5 Joyful Baking Tips for a Sweets Christmas Tree Theme
Creative Twists
- Chocolate Lovers’ Tree: Swap half the flour for cocoa powder to create a chocolate base. Top with chocolate candies to enhance the theme.
- Nutty Delight: Add chopped nuts into the batter for a delightful crunch, or use almond icing for decoration.
- Fruit-Filled Tree: Incorporate dried fruits like cranberries or raisins into the batter for a burst of flavor and texture.
Dietary Adjustments
For a vegan Sweets Christmas Tree, substitute eggs with flax eggs and use plant-based milk. To make it gluten-free, utilize almond or coconut flour while ensuring all candies are gluten-free.
Conclusion about 5 Joyful Baking Tips for a Sweets Christmas Tree Theme
Creating a Sweets Christmas Tree is more than just baking; it’s about the joy and laughter shared among family and friends. With these 5 Joyful Baking Tips for a Sweets Christmas Tree Theme, you can transform simple ingredients into a stunning centerpiece for your holiday celebrations.
This festive treat not only showcases your baking skills but also serves as a delightful way to bring everyone together. Whether it’s the enchanting presentation or the scrumptious flavors, every bite is a reminder of the magic of the season. This holiday, let your creativity shine in the kitchen, and make unforgettable memories by creating your very own Sweets Christmas Tree.
FAQs about 5 Joyful Baking Tips for a Sweets Christmas Tree Theme
Can I make the base ahead of time?
Yes, you can bake the base in advance. Just make sure to store them properly.
How long can I store the Sweets Christmas Tree?
You can keep the tree at room temperature for three days or refrigerate it for about a week.
What’s the best way to freeze it?
Wrap the tree tightly in plastic wrap, followed by aluminum foil. It will last for up to three months.
Can I use different kinds of icing?
Absolutely! Cream cheese icing or buttercream can add a unique twist to your tree.
What if I don’t have tree-shaped molds?
You can use a round cake pan and stack them to form a tree shape.
Can I add flavors to the icing?
Yes, you can incorporate extracts like peppermint or almond for a festive flavor.
How do I prevent the cake from sticking?
Make sure to grease and flour the molds or use parchment paper for easy removal.
Can I make a gluten-free version?
Yes, by using gluten-free flour instead of regular flour, you can make a gluten-free tree.
Is it possible to make it dairy-free?
Certainly! You can substitute butter with coconut oil and use non-dairy milk.
How should I decorate my tree?
Use a variety of candies and toppings! Creativity is key to making your tree stand out.

Sweets Christmas Tree
Ingredients
Base Ingredients
- 2 cups all-purpose flour Can substitute with gluten-free flour.
- 1 cup granulated sugar
- ½ cup unsalted butter, softened Can substitute with coconut oil for a dairy-free version.
- 2 large eggs For vegan version, use flax eggs.
- 1 cup powdered sugar (for icing)
- ¼ cup milk (for icing) Can substitute with almond milk for a dairy-free version.
- 1 tsp vanilla extract
- Assorted pieces candies for decoration (M&M’s, gumdrops, chocolate chips) Choose candies based on preference.


Instructions
Preparation
- Gather all your ingredients and measure them out. Preheat your oven to 350°F (175°C).
- In a mixing bowl, cream together the softened butter and granulated sugar until light and fluffy, about 3-4 minutes.
- Add the eggs one at a time, mixing well after each addition, then incorporate the vanilla extract.
- In another bowl, whisk together the flour and a pinch of salt. Gradually add this dry mixture to the wet ingredients, blending gently.
Baking
- Grease your tree-shaped molds or line with parchment paper. Pour the batter into the molds evenly.
- Bake in the preheated oven for 25-30 minutes or until a toothpick inserted comes out clean. Allow to cool in molds for a few minutes before transferring to a wire rack.
Decorating
- While the cakes cool, prepare the icing by mixing powdered sugar with milk until thick yet spreadable.
- Once cakes are cool, stack them using icing between layers to shape into a tree. Decorate with assorted candies and edible glitter.