
This post may contain affiliate links. As an Amazon Associate, I earn from qualifying purchases at no extra cost to you.
Table of Contents
🍴 Top Kitchen Essentials You'll Love


Introduction to Valentine’s Day Cookie Cups
Valentine’s Day is a time for love, affection, and, of course, delicious treats! Among the many delightful recipes that can capture the heart of anyone you serve them to, the Valentine’s Day Cookie Cups stand out. These cute, sweet treats are a wonderful way to celebrate love and share happiness. But what makes these cookie cups truly special?
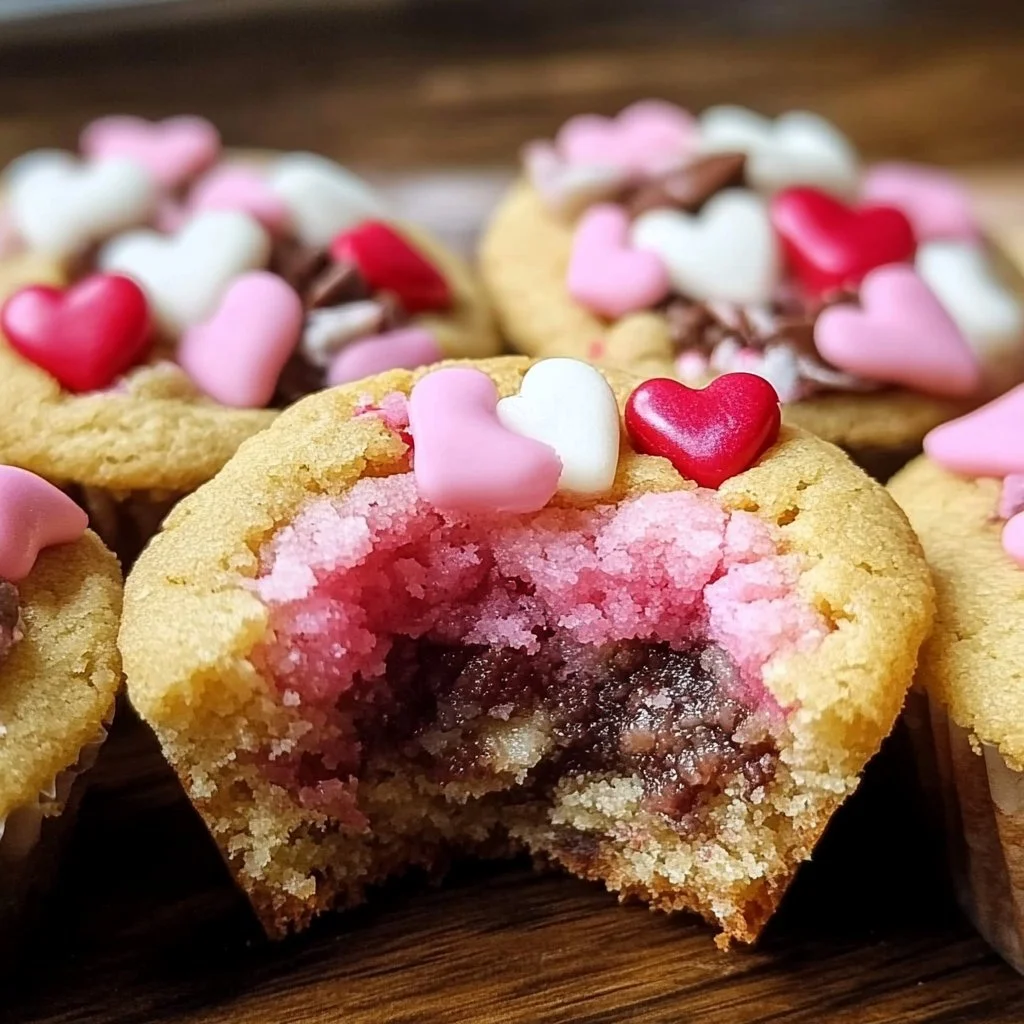
Just imagine biting into a soft, chewy cookie filled with a delightful Hershey’s hug in the center. The combination of flavors is truly irresistible. What’s more, they’re incredibly easy to make. Using a simple sugar cookie mix, these Valentine’s Day Cookie Cups can be whipped up quickly, making them the perfect dessert for busy couples or families.
These cookie cups not only look bright and festive with colorful food coloring and sprinkles, but they also offer a unique twist to the average cookie. They can be easily customized to fit your preferences or dietary needs, making them perfect for any occasion. So, whether you’re planning a romantic evening or a get-together with friends, these treats will surely steal the show!
With a minimal list of ingredients and straightforward instructions, it’s a treat that even novice bakers can master. So, are you ready to impress your loved ones this Valentine’s Day? Let’s dive into the sweet world of Valentine’s Day Cookie Cups!
Key Benefits of Valentine’s Day Cookie Cups
Why You’ll Love This Recipe
- Simple to Make: Quick and easy steps make baking a breeze.
- Delicious Flavors: The combination of cookies and chocolate makes for a match made in heaven.
- Family-Friendly: Kids love to help make them and will enjoy eating them too.
- Customizable: Add your favorite colors, flavors, or toppings!
- Perfect for Any Occasion: Ideal for Valentine’s Day but versatile enough for other celebrations.
- Beautiful Presentation: Gorgeous little cups that catch the eye and tastebuds alike!
What Makes It Stand Out
These Valentine’s Day Cookie Cups are incredibly original thanks to their adorable shape and charming presentation. Unlike traditional cookies, they cradle a yummy surprise inside, making each bite full of excitement. You can adjust the color to fit different themes or occasions, so they’re not just limited to Valentine’s Day.
Moreover, these cookie cups provide an opportunity for customization. Add a variety of toppings or fillings according to your taste, ensuring that no two batches need to be the same. This versatility makes these treats a unique addition to any festive spread.
Ingredients for Valentine’s Day Cookie Cups
Complete Ingredient List with Measurements
- 1 (17.5-ounce) package sugar cookie mix
- ½ cup (1 stick) salted butter, melted
- 3 tablespoons all-purpose flour
- 1 large egg, room temperature
- Pink/red food coloring
- 24–26 Hershey’s hugs, unwrapped
- Decorative sprinkles (optional topping)
Substitutes and Alternatives
If you’re looking for alternatives due to allergies or dietary preferences, there are many options available. For example, you can substitute the sugar cookie mix with a gluten-free alternative to make this recipe suitable for those with gluten intolerance.
For dairy-free options, use vegan butter instead of salted butter. You can also swap the Hershey’s hugs for dairy-free chocolate alternatives to cater to vegan diets. These adjustments allow everyone to enjoy the deliciousness of Valentine’s Day Cookie Cups!
How to Make Valentine’s Day Cookie Cups – Step-by-Step Directions
Step 1 – Prepare Ingredients
Start by gathering your ingredients. This includes the sugar cookie mix, melted butter, flour, egg, and food coloring. Be sure your egg is at room temperature for better mixing. Preheat your oven to 350 degrees Fahrenheit and spray a mini cupcake pan with cooking spray to prevent sticking.
Step 2 – Mix the Dough
In a large bowl, combine the sugar cookie mix, melted butter, flour, egg, and food coloring. Using a hand mixer or mixing spoon, beat the mixture until just combined. Don’t overmix; you want it to be smoothly blended but still soft. Adjust the amount of food coloring based on how vibrant you want your cookie cups to be.
Step 3 – Shape the Cookies
Take about 1 tablespoon of the cookie dough mixture and flatten it to the size of your palm. This will allow you to wrap it easily around the Hershey’s hug. Make sure to create a flat circle that’s thick enough to hold the chocolate.
Step 4 – Add the Chocolate
Place an unwrapped Hershey’s hug in the center of your flattened cookie dough. Gently wrap the dough around the chocolate, crafting a ball. Be sure that the chocolate is well covered so it becomes a delightful surprise once you take a bite.
Step 5 – Fill the Muffin Pan
Place the filled cookie dough ball into the muffin pan cavity, ensuring it stands upright. Repeat this process until all of the cookie dough is used, leaving enough space for the cookies to expand while baking.
Step 6 – Bake the Cookie Cups
Slide the muffin pan into the preheated oven and bake for about 10-12 minutes. Keep an eye on them; they are done when the outsides look set and slightly golden. The cookie cups should maintain a soft center because they will firm up as they cool.
Step 7 – Decorate
Once out of the oven, let the cookie cups cool for a brief moment. This is the perfect time to top them with decorative sprinkles before they cool completely. The warmth from the cookies will help the sprinkles stick beautifully.
Step 8 – Cool Off
Allow the cookie cups to cool in the pan for about 15 minutes. This will make it easier to remove them without breaking. They’re at their best when enjoyed fresh, but they still taste amazing later!
Serving Suggestions for Valentine’s Day Cookie Cups
Best Occasions to Serve This Dish
Valentine’s Day is the obvious occasion for these cookie cups, perfect for surprised loved ones or as a dessert for a romantic dinner. However, they’re equally fantastic for birthdays, baby showers, or even casual get-togethers. The colorful and festive appeal makes them ideal for celebrations year-round.
What to Serve With It
These delightful cookie cups can be served up with a glass of milk, a scoop of ice cream, or even as a sweet side with a homemade fruit salad. Pair them with themed drinks like strawberry smoothies or sparkling lemonade for a beautiful presentation.
How to Store Valentine’s Day Cookie Cups Properly
Best Storage Practices
To store your Valentine’s Day Cookie Cups, allow them to cool completely. Then, place them in an airtight container at room temperature for up to a week. If you plan to keep them longer, consider freezing them.
Reheating and Freezing Tips
To reheat, pop the cookie cups in the microwave for about 10-15 seconds until warm. For freezing, package them individually or in small groups with parchment paper in between to prevent sticking. Store them in a freezer-safe container, and they will remain fresh for up to three months.
Tips & Tricks for Valentine’s Day Cookie Cups
Mistakes to Avoid
1 – Overmixing the Dough: This can lead to tough cookies; mix just until combined.
2 – Not Preheating the Oven: An unheated oven may affect baking time and texture.
3 – Overbaking: Keep a close watch during the last few minutes to avoid dryness.
4 – Skipping the Cooking Spray: This can result in sticking and broken cookie cups.
5 – Not Cooling Before Removing: Give the cookies time to firm up to prevent tearing.
Extra Tips for Better Results
For added flavor, consider mixing in some vanilla extract or almond extract into the dough. Another great tip is to alternate the types of chocolate candies used inside for a fun surprise. This not only enhances the taste but also creates visual excitement.
Recipe Variations of Valentine’s Day Cookie Cups
Creative Twists
1 – Chocolate Chip Cookie Cups: Instead of sugar cookie mix, use a chocolate chip cookie base and fill with a Reese’s peanut butter cup for a heavenly twist.
2 – Nutty Cookie Cups: Add chopped nuts like walnuts or pecans into the cookie dough for a delightful crunch.
3 – Citrus Zest: Incorporate lemon or orange zest for a refreshing citrus flavor that complements the sweetness beautifully.
Dietary Adjustments
For a vegan option, use a flax egg instead of a regular egg and vegan butter. To make them gluten-free, ensure your sugar cookie mix is labeled gluten-free, and follow any adjustments accordingly. Dairy-free chocolate candies can also replace the Hershey’s hugs.
Conclusion about Valentine’s Day Cookie Cups
Valentine’s Day Cookie Cups are not merely a dessert; they represent joy and affection, making them one of the most heartfelt treats you can prepare. With their beautiful presentation and mouthwatering taste, they are sure to impress anyone lucky enough to receive them. Whether for a date night, a family get-together, or simply to satisfy your own cravings, these cookie cups tick all the boxes of a perfect treat. Easy to make and endlessly customizable, they invite joy to any occasion. Don’t wait any longer—bake a batch of Valentine’s Day Cookie Cups and make your day a little sweeter!
FAQs about Valentine’s Day Cookie Cups
Can I make these cookie cups in advance?
Yes! You can prepare the cookie dough ahead of time and store it in the fridge for a couple of days or even freeze it for later.
What’s the best way to store leftovers?
Store leftover cookie cups in an airtight container at room temperature for up to a week.
Can I freeze these cookie cups?
Absolutely! Freeze them in an airtight container, and they’ll keep well for up to three months.
What’s the best way to reheat them?
Reheat in the microwave for about 10-15 seconds for a warm treat.
Can I substitute the Hershey’s hugs?
Yes, feel free to use any type of chocolate or candy you prefer, such as chocolate chips, peanut butter cups, or almond kisses.
Do these cookies require any special tools?
All you need is a mini muffin pan and basic mixing tools. No specialized equipment is required!
Can I add different colors to the cookie cups?
Definitely! Adjust the amount of food coloring according to the look you desire.
Are the cookie cups gluten-free?
You can make these gluten-free by using a gluten-free sugar cookie mix.

Valentine’s Day Cookie Cups
Ingredients
Main Ingredients
- 1 package 17.5-ounce package sugar cookie mix Can substitute with gluten-free alternative.
- 0.5 cup salted butter, melted Use vegan butter for a dairy-free option.
- 3 tablespoons all-purpose flour
- 1 large egg, room temperature Use a flax egg for a vegan option.
- to taste Pink/red food coloring Adjust according to your desired color.
- 24-26 Hershey’s hugs, unwrapped Can substitute with any chocolate or candy.
- to taste Decorative sprinkles (optional topping)


Instructions
Preparation
- Preheat your oven to 350°F and spray a mini cupcake pan with cooking spray.
- Gather the sugar cookie mix, melted butter, flour, egg, and food coloring.
Mixing the Dough
- In a large bowl, combine sugar cookie mix, melted butter, flour, egg, and food coloring.
- Beat until just combined, ensuring not to overmix.
Shaping the Cookies
- Take about 1 tablespoon of dough and flatten it to a circle.
- Wrap the circle around a Hershey’s hug to form a ball.
Baking
- Place the cookie balls in the muffin pan, leaving enough space for expansion.
- Bake for 10-12 minutes until the edges are set and slightly golden.
Decorating
- Let the cookie cups cool slightly before adding decorative sprinkles.
- Allow them to cool in the pan for about 15 minutes.