
This post may contain affiliate links. As an Amazon Associate, I earn from qualifying purchases at no extra cost to you.
Table of Contents
🍴 Top Kitchen Essentials You'll Love


Introduction to Christmas Rocky Road
The holiday season brings with it a flurry of festivities, flavors, and of course, sweet treats. Nothing captures the spirit of joyful indulgence quite like Christmas Rocky Road. This delightful combination of textures and flavors is a childhood favorite for many, evoking fond memories of family gatherings and cozy evenings by the fire. One bite of this delicious confection, with its rich chocolate coating, crunchy nuts, fluffy marshmallows, and chewy dried fruits, and you’ll be transported to a world of holiday cheer.
But what makes the Christmas Rocky Road even more special is its sheer versatility. Whether you’re hosting a festive gathering or simply want to enjoy a homemade treat, this recipe fits right in. It’s a treat that’s incredibly easy to whip up, requiring minimal effort but yielding maximum satisfaction. Plus, there’s something immensely gratifying about making your own holiday sweets. You can tailor the ingredients to suit your personal preferences, making it truly custom to your tastes.
Imagine presenting a beautifully cut square of Christmas Rocky Road after a hearty Christmas dinner; the oohs and aahs would be impossible to resist. With each piece, you not only share a comforting dessert but also create shared experiences and joyful memories. Isn’t it wonderful how food has the power to bring people together? As the kitchen fills with warm chocolatey scents, the love and joy of Christmas unfold through this easy yet delectable recipe.
Key Benefits of Christmas Rocky Road
Why You’ll Love This Recipe
- Decadent Taste: The chocolate coating combined with crunchy and chewy ingredients creates a rich flavor profile.
- Simple Preparation: With just a few easy steps, you can create a confection that looks and tastes professional.
- Versatile Ingredients: Customize it with your favorite nuts, dried fruits, or even cookies to make it uniquely yours.
- Perfect for All Occasions: This recipe is great for Christmas, parties, or any time you want to indulge a sweet tooth.
- Great Gift Option: Homemade Christmas Rocky Road can be easily packed into jars or boxes for thoughtful gifts.
- No Baking Required: You can enjoy the satisfaction of homemade sweets without the heat of the oven.
What Makes It Stand Out
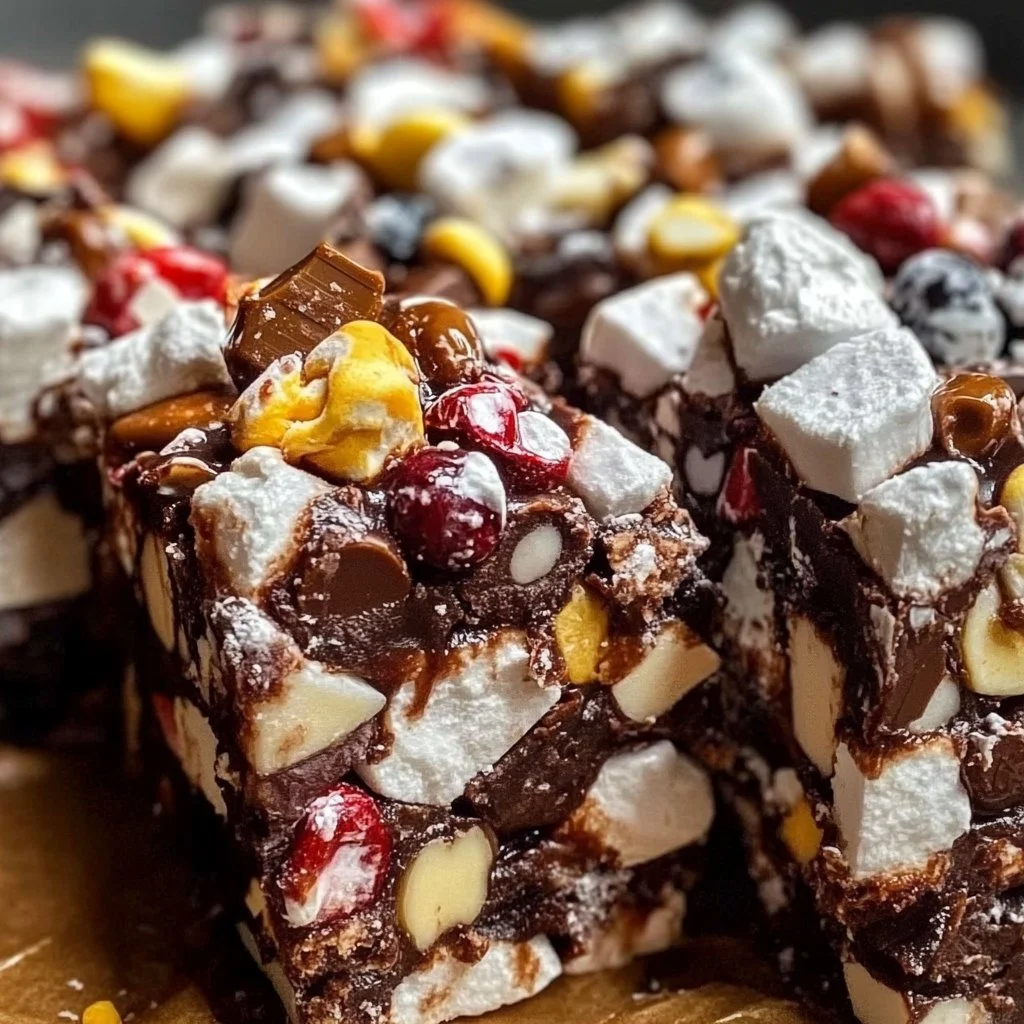
Christmas Rocky Road stands out not just for its incredible taste but also for its charming appearance. Layers of colorful marshmallows and fruits peek through the chocolate, creating a festive look that mirrors the spirit of the holidays. The crunchy finish adds a delightful texture that contrasts beautifully with the smooth chocolate.
Additionally, this recipe is easily customizable, allowing it to shine in various celebrations. You could opt for walnuts one time and switch to pistachios the next. You might use dried cherries this year and dried apricots next. The possibilities are endless. This adaptability makes Christmas Rocky Road a memorable go-to treat throughout the year, not just during the holidays.
Ingredients for Christmas Rocky Road
Complete Ingredient List with Measurements
- 200g chocolate (milk or dark)
- 100g mini marshmallows
- 100g nuts (such as walnuts or almonds)
- 75g dried fruit (such as cherries or raisins)
- 75g digestive biscuits or graham crackers
- Butter (for greasing the pan)
Substitutes and Alternatives
For those with dietary restrictions or allergies, there are plenty of substitutes to make this recipe work for everyone. For a nut-free version, you can either omit the nuts altogether or substitute them with seeds like sunflower seeds or pumpkin seeds. If you’re gluten-intolerant, using gluten-free biscuits such as almond flour cookies or gluten-free graham crackers is a delicious alternative.
For a vegan option, dark chocolate with no dairy can replace traditional chocolate, and you can explore using vegan marshmallows. You could also substitute the dried fruit with any fruit that meets your dietary needs, ensuring the outcome remains delicious while fitting within your dietary preferences.
How to Make Christmas Rocky Road – Step-by-Step Directions
Step 1 – Prepare Ingredients
Start by measuring all your ingredients. Crush the digestive biscuits into coarse pieces—this will enhance the crunch texture in your Christmas Rocky Road. Chop your nuts roughly, and if you’re using larger fruits, consider cutting them down into bite-sized pieces.
Step 2 – Line the Dish
Take a square baking dish and line it with parchment paper. This step is crucial for easy removal and will ensure that your chocolate doesn’t stick to the sides of the dish once it sets. Grease the paper lightly with butter for good measure.
Step 3 – Melt the Chocolate
In a heatproof bowl, break the chocolate into smaller pieces. Place the bowl over a pot of simmering water, ensuring the bowl doesn’t touch the water. Stir the chocolate occasionally until it’s completely melted and smooth. Remove it from the heat and let it cool slightly.
Step 4 – Combine Ingredients
In a large mixing bowl, combine the mini marshmallows, chopped nuts, dried fruits, and crushed biscuits. Mix everything thoroughly so that the ingredients are well distributed. This will help ensure that every square of your Christmas Rocky Road is packed with flavor and texture.
Step 5 – Mix with Chocolate
Pour the melted chocolate over the mixture in the bowl. Use a spatula to fold the chocolate gently into the mix, ensuring that all ingredients are evenly coated. Be careful not to crush the marshmallows during this process; you want them to remain fluffy.
Step 6 – Transfer to Dish
Once everything is thoroughly mixed, transfer the mixture into your lined baking dish. Use the spatula to press it down firmly and spread it evenly. Ensure there are no gaps or air pockets, which may affect how well it sets.
Step 7 – Refrigerate
Place the baking dish in the refrigerator and let it set for at least 2 hours. This time allows the chocolate to harden properly, creating that perfect chewy yet firm texture. Once set, it will be easier to cut into squares.
Step 8 – Cut and Serve
Remove the Christmas Rocky Road from the fridge, take it out of the dish using the parchment paper, and place it on a cutting board. Using a sharp knife, cut into even squares. The size is up to you; larger pieces can be indulgent while smaller pieces are perfect for sharing.
Step 9 – Enjoy
Your homemade Christmas Rocky Road is now ready to be enjoyed! Serve it on a platter, gift it to friends, or keep it for yourself as a holiday treat. Each bite is sure to bring a smile!
Serving Suggestions for Christmas Rocky Road
Best Occasions to Serve This Dish
Christmas Rocky Road is perfect for any festive occasion. It shines on holiday dessert tables, surrounded by other delicious treats. Additionally, it’s an excellent addition to party trays or to bring along to potluck gatherings where you want to make a memorable impression. Given its no-bake nature, it’s also fantastic for quick family get-togethers.
What to Serve With It
Pair your Christmas Rocky Road with a warm cup of hot cocoa for a classic combination. It also goes well with coffee, adding a delightful contrast. For the adults, serving it alongside a dessert wine or spiced holiday cocktail can make for a sophisticated pairing that elevates the indulgence.
How to Store Christmas Rocky Road Properly
Best Storage Practices
To keep your Christmas Rocky Road fresh, store it in an airtight container in the fridge. This will help maintain its texture and flavor. If you prefer, you can keep them at room temperature for a softer bite but ensure the container is still airtight to prevent them from drying out.
Reheating and Freezing Tips
You do not need to reheat Christmas Rocky Road, as it is best enjoyed chilled or at room temperature. If you wish to freeze it, wrap individual pieces in plastic wrap and then in a freezer-safe container. To enjoy, simply thaw them in the fridge overnight without any need for additional reheating.
Tips & Tricks for Christmas Rocky Road
Mistakes to Avoid
- Not Greasing the Pan: Failing to grease the parchment paper can lead to tearing when you try to remove the rocky road.
- Overheating the Chocolate: Ensure the chocolate is melted just right; overheating can cause it to seize.
- Skipping the Refrigerating Step: Allowing enough time for setting is crucial; skipping this can result in a gooey mess.
- Not Mixing Gently: Mixing too aggressively can crush the marshmallows and alter the texture.
- Inconsistent Sizing: Uneven cutting can affect presentation; use a ruler for precise measurements if desired.
Extra Tips for Better Results
- Use Quality Chocolate: The better the chocolate, the richer the flavor. Opt for a brand you love.
- Add a Pinch of Sea Salt: A sprinkle of sea salt over the top before refrigerating can enhance the chocolate’s flavor profile.
- Include Spices: Consider adding spices like cinnamon or nutmeg for a festive twist on flavors.
Recipe Variations of Christmas Rocky Road
Creative Twists
- Peppermint Crunch: Add crushed peppermint candies into the mix or sprinkle on top for a refreshing holiday twist.
- Caramel Layer: Incorporate a layer of caramel between the chocolate and the mix for a gooey, sweet surprise.
- Fruity Fun: Substitute traditional dried fruits with exotic ones like mango or pineapple for a tropical vibe.
Dietary Adjustments
For those needing dietary modifications, consider replacing the milk chocolate with dairy-free chocolate to create a vegan version. Gluten-free options like almond flour biscuits can replace standard digestive biscuits to cater to gluten sensitivity.
Conclusion about Christmas Rocky Road
In summary, Christmas Rocky Road isn’t just a dessert; it’s a delightful experience filled with rich flavors, varied textures, and the joy of sharing sweet treats with loved ones. Its simplicity combined with its festive charm makes it an ideal choice for holiday gatherings, family celebrations, or quiet moments at home enjoying a well-deserved treat. Experimenting with the recipe allows for endless possibilities, letting you create a version that suits your taste while adapting to any dietary needs. Share this treat, gift it, or enjoy it solo; no matter how you experience it, Christmas Rocky Road is sure to make your holiday season even brighter.
FAQs about Christmas Rocky Road
How long does Christmas Rocky Road last?
Christmas Rocky Road can last about a week in the fridge if stored properly in an airtight container.
Can I make Christmas Rocky Road ahead of time?
Yes, you can make it up to a week in advance. Just ensure you store it in the fridge until you’re ready to serve.
What can I substitute for marshmallows in Christmas Rocky Road?
You can use mini marshmallows or vegan marshmallows if dietary needs require it; just ensure they hold up during mixing.
Can I freeze Christmas Rocky Road?
Yes, you can freeze it for up to 3 months. Wrap it well in plastic wrap and store it in a freezer-safe container.
What nuts work best in Christmas Rocky Road?
Common choices include walnuts or almonds, but you can use any nut you prefer, such as pecans or hazelnuts.
How do I know when my Christmas Rocky Road is set?
It should be firm to the touch and hold its shape when you remove it from the dish.
Can I add different types of chocolate?
Absolutely! Mixing dark and milk chocolate creates a rich flavor and enhances the overall taste.
Can I substitute the biscuits for something else?
Yes, gluten-free biscuits or even crushed cereal can be used as alternatives to digestion biscuits.

Christmas Rocky Road
Ingredients
Main Ingredients
- 200 g chocolate (milk or dark) Use high quality for best flavor.
- 100 g mini marshmallows Vegan marshmallows can be used for a vegan version.
- 100 g nuts (such as walnuts or almonds) You can use any preferred nuts.
- 75 g dried fruit (such as cherries or raisins) Feel free to substitute with other dried fruits.
- 75 g digestive biscuits or graham crackers Gluten-free biscuits can be used for gluten sensitivity.
- Butter For greasing the pan.


Instructions
Preparation
- Start by measuring all your ingredients.
- Crush the digestive biscuits into coarse pieces.
- Chop your nuts roughly, and cut larger dried fruits into bite-sized pieces.
Assembly
- Line a square baking dish with parchment paper and grease lightly with butter.
- Melt chocolate in a heatproof bowl over simmering water, stirring until smooth, then remove from heat and cool slightly.
- In a mixing bowl, combine mini marshmallows, chopped nuts, dried fruits, and crushed biscuits.
- Pour melted chocolate over the mixture and fold gently to coat all ingredients without crushing marshmallows.
- Transfer mixture to the lined dish, press down firmly and evenly to remove air pockets.
Setting
- Refrigerate for at least 2 hours until firm.
- Once set, remove from the dish using the parchment paper and cut into squares.
Serving
- Serve on a platter, gift to friends, or enjoy at home.