

This post may contain affiliate links. As an Amazon Associate, I earn from qualifying purchases at no extra cost to you.
Table of Contents
🍴 Top Kitchen Essentials You'll Love


Introduction to Plum Jam
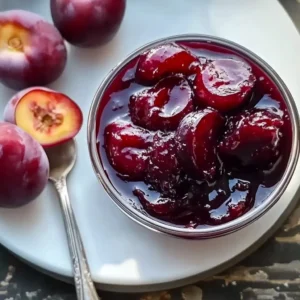
There’s a certain magic in transforming fresh seasonal fruit into a sweet, spreadable delight. Plum Jam offers a perfect example of this delicious metamorphosis. Picture this: ripe, juicy plums bursting with flavor, combined with sugar and just a hint of lemon, simmered to perfection. Doesn’t it sound truly delightful? This recipe doesn’t just offer a way to preserve these beautiful fruits; it creates a little jar of happiness you can enjoy anytime.
What makes this Plum Jam special is its versatility. Whether you’re slathering it on warm toast, pairing it with a cheese platter, or using it as a filling in pastries, the candid burst of plum flavor will elevate any dish. It’s an easy recipe that even beginners can tackle, turning any kitchen into a bustling jam-making factory. You’ll not only make your kitchen smell heavenly but also impress friends and family who are lucky enough to receive a jar or two.
Moreover, there’s a sense of satisfaction that comes from making homemade jam. It’s a connection to tradition, a way to unlock memories of family gatherings and cherished meals. The process, though simple, can be a delightful ritual.
Key Benefits of Plum Jam
Why You’ll Love This Recipe
- Flavorful: The combination of sweet and tart in Plum Jam is irresistible.
- Easy to Make: With just a few ingredients and simple steps, anyone can create this treat.
- Versatile: Use it in desserts, breakfast spreads, or even as a glaze for meats.
- Customizable: You can easily tweak the ingredients to suit your taste.
- Perfect Gift: A jar of homemade jam makes for a thoughtful and personal gift.
- Seasonal Treat: Capture the flavors of summer with this delightful preserve.
What Makes It Stand Out
This homemade Plum Jam is not just another fruit preserve; it embodies creativity and personalization. You can add spices or other fruits to create variations that reflect your unique palate. Whether it’s a chilly winter morning or a sunny summer brunch, Plum Jam brings a touch of joy and flavor to any setting.
Making this jam isn’t just about the end product; it’s about the experience. Small modifications in the cooking process can elevate its taste. Perhaps adding a hint of cinnamon or ginger to the mix? You can customize this traditional recipe to suit any occasion—be it casual gatherings or festive celebrations.
Ingredients for Plum Jam
Complete Ingredient List with Measurements
- 2 pounds ripe plums, pitted and chopped
- 1 cup sugar
- 1/4 cup lemon juice
- 1/2 teaspoon vanilla extract (optional)
- 1/4 teaspoon salt
Substitutes and Alternatives
If you find yourself with allergies or dietary preferences, there are several alternatives to consider. For those avoiding refined sugar, natural sweeteners like honey or maple syrup can serve well, adjusting measurements to taste. As for the vanilla extract, it’s entirely optional; you could easily swap it for almond extract or leave it out altogether for a more straightforward jam flavor.
If you’re looking for a lower-sugar option, try reducing the sugar by half and adding more lemon juice. The results may vary slightly, but the jam will still be delicious.
How to Make Plum Jam – Step-by-Step Directions
Step 1 – Prepare Ingredients
Start by thoroughly washing the ripe plums. Cut them in half to remove the pits and chop them into small pieces. You’ll need about 2 pounds of fruit for this recipe.
Step 2 – Cook the Base
In a large pot, combine the chopped plums, sugar, lemon juice, vanilla extract, and salt. Cook over medium heat. Stir frequently until the sugar dissolves, and the mixture begins to boil. This phase fills your kitchen with the enticing aroma of sweet, fruity goodness.
Step 3 – Simmer the Jam
Once boiling, reduce the heat and let the mixture simmer. Stir occasionally for about 30-40 minutes. It’s done when the jam thickens and reaches your desired consistency. Keep an eye on it to prevent sticking or burning.
Step 4 – Check the Consistency
To test the thickness, place a small spoonful on a cold plate. After a minute, run your finger through it; if it holds the line, your jam is ready. If not, continue cooking for a few more minutes.
Step 5 – Remove from Heat
Once thickened, remove the pot from heat and let it cool for a few minutes. The color will deepen, providing a visual cue of its readiness.
Step 6 – Sterilize Jars
While your jam cools, prepare your jars. Make sure they are clean and sterilized. You can do this by boiling them in water for a few minutes or running them through a dishwasher cycle.
Step 7 – Pour the Jam
Carefully pour the mixture into your sterilized jars, leaving about 1/4 inch of headspace at the top. Wipe any residue from the rim with a clean cloth before sealing.
Step 8 – Seal and Cool
After filling the jars, secure the lids tightly. Allow the jars to cool completely. You’ll hear a satisfying “pop” as they seal, ensuring freshness.
Step 9 – Store the Jam
Once cool, store your Plum Jam in the refrigerator. It should last for several weeks when properly sealed.
Step 10 – Enjoy!
Now that your Plum Jam is ready, dig in! Spread it on toast, mix it into yogurt, or just enjoy it straight from the jar.
Serving Suggestions for Plum Jam
Best Occasions to Serve This Dish
Plum Jam shines in various settings. Serve it at breakfast with warm croissants or pancakes, or include it in a cheese platter at parties. It also makes for a delightful addition to holiday meals, adding a burst of color and flavor to the table.
What to Serve With It
This jam pairs wonderfully with soft cheeses like brie or goat cheese. Use it as a filling for pastries or thumbprint cookies. You can even swirl it into oatmeal or yogurt for a quick and tasty breakfast option. For something different, consider using it as a glaze for grilled meats or roasted vegetables; the sweet and tart notes complement savory flavors beautifully.
How to Store Plum Jam Properly
Best Storage Practices
To keep your homemade Plum Jam fresh, store it in airtight jars in the refrigerator. It should remain tasty for about 3 to 4 weeks. If you want to extend its shelf life, consider canning it using proper canning techniques for longer preservation.
Reheating and Freezing Tips
If you find yourself with extra Plum Jam, freezing is an option! Spoon it into freezer-safe containers, leaving room for expansion. To thaw, place it in the fridge overnight or run the container under warm water. For reheating, a brief stint in the microwave or a small saucepan works perfectly; just be sure to stir it well.
Tips & Tricks for Plum Jam
Mistakes to Avoid
- Not Using Ripe Plums: Ensure your plums are fully ripe for the best flavor.
- Skipping Sterilization: Always sterilize jars to prevent spoilage.
- Overcooking: Keep an eye on the jam as it simmers; you don’t want it to become too thick.
- Neglecting to Stir: Stir frequently to avoid scorching the bottom.
- Improper Sealing: Make sure your jars are sealed tightly to maintain freshness.
Extra Tips for Better Results
For an extra burst of flavor, consider adding a pinch of cinnamon or cloves during cooking. You can also mix in other fruits, like peaches or berries, for a unique twist. Presentation can make a difference, so consider labeling jars with the date and flavor for a personal touch.
Recipe Variations of Plum Jam
Creative Twists
- Spiced Plum Jam: Add a few cloves or cinnamon sticks during cooking for a spiced version. Remove them before storing.
- Plum Berry Jam: Mix in a cup of blueberries or raspberries when simmering for a colorful and flavorful change.
- Chili Plum Jam: Add a dash of crushed red pepper flakes for a sweet and spicy combination.
Dietary Adjustments
For a vegan version, simply ensure your sugar is vegan-friendly. You can substitute with agave syrup or coconut sugar for a different flavor profile. To make it gluten-free, enjoy the jam as is—there are no gluten-containing ingredients here!
Conclusion about Plum Jam
Making your own Plum Jam is not just about canning; it’s an opportunity to create something delicious and timeless. The process is straightforward, and the rewards are immense—a taste of summer captured in a jar. Whether you share it with loved ones or keep it all for yourself, this jam is sure to bring joy to your everyday meals. So grab your plums, and let’s get stirring!
FAQs about Plum Jam
Can I make Plum Jam without sugar?
Yes, you can use natural sweeteners like honey or agave syrup, adjusting the amounts to taste.
How long does Plum Jam last?
When refrigerated, your homemade Plum Jam should last around 3 to 4 weeks.
Can I freeze Plum Jam?
Yes, it freezes well! Spoon it into airtight containers, leaving room for expansion before sealing.
What is the best way to store it?
Store in sterilized jars in the fridge for optimal freshness and flavor.
Can I use other fruits?
Absolutely! You can mix in other fruits like peaches or berries for unique flavor combinations.
Can I reduce the sugar in the recipe?
Yes, you can experiment with reducing the sugar, but ensure to adjust the lemon juice for balance.
How do I know when it’s done cooking?
The jam is ready when it holds a line on a cold plate and has thickened to your preference.
Can I make this in smaller batches?
Certainly! Feel free to halve the ingredients for a smaller supply.
Is Plum Jam suitable for canning?
Yes, follow proper canning techniques to preserve your Plum Jam for longer storage.
How can I use Plum Jam besides toast?
Use it as a filling for pastries, a topping for yogurt, or even as a glaze for meats or grilled vegetables.
Plum Jam
Ingredients
Main Ingredients
- 2 pounds ripe plums, pitted and chopped Ensure they are fully ripe for the best flavor.
- 1 cup sugar Natural sweeteners can be used as substitutes.
- ¼ cup lemon juice Adds acidity for balancing sweetness.
- ½ teaspoon vanilla extract Optional; can be replaced with almond extract.
- ¼ teaspoon salt Enhances flavor.


Instructions
Preparation
- Wash the ripe plums thoroughly. Cut them in half to remove the pits and chop them into small pieces.
Cooking
- In a large pot, combine the chopped plums, sugar, lemon juice, vanilla extract, and salt. Cook over medium heat.
- Stir frequently until the sugar dissolves, and the mixture begins to boil.
- Reduce the heat and let the mixture simmer for about 30-40 minutes, stirring occasionally.
- Test the thickness by placing a small spoonful on a cold plate; it should hold a line when ready.
Jarring
- Remove the pot from heat and let it cool for a few minutes.
- Sterilize your jars by boiling them or running them through a dishwasher cycle.
- Pour the jam into sterilized jars, leaving about 1/4 inch of headspace at the top.
- Secure the lids tightly and allow jars to cool completely.
- Store the jam in the refrigerator for up to 3-4 weeks.
Enjoying
- Spread on toast, mix into yogurt, or enjoy straight from the jar.